- Bean定义
- BeanMetadataElement元数据接口
-
- BeanMetadataAttribute元数据属性
- AttributeAccessor属性访问器
-
- AttributeAccessorSupport属性访问抽象实现类
- BeanMetadataAttributeAccessor元数据属性访问器
- BeanDefinition
-
- 主要方法
Bean定义
后面我们频繁的会跟bean定义打交道,所以我们先要知道什么是bean定义,定义了什么呢,如果不了解这个,后面看下去一头雾水,很多东西怎么得来的不清楚,所以还是要先有个了解,我把相关的一些借口和类先介绍下。
BeanMetadataElement元数据接口
首先我们要能获得源数据,也就是这个bean是来自哪个对象的,我们就可以获得一些相关的信息。
public interface BeanMetadataElement {


	@Nullable
	default Object getSource() {


		return null;
	}

}
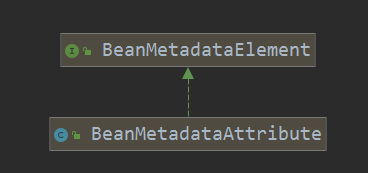
BeanMetadataAttribute元数据属性

实现了元数据接口,增加了属性的名字和值。
public class BeanMetadataAttribute implements BeanMetadataElement {


	//属性名字
	private final String name;
	//属性值
	@Nullable
	private final Object value;
	//bean的来源
	@Nullable
	private Object source;
	//将名字和值封装起来
	public BeanMetadataAttribute(String name, @Nullable Object value) {


		Assert.notNull(name, "Name must not be null");
		this.name = name;
		this.value = value;
	}

	public String getName() {


		return this.name;
	}
	@Nullable
	public Object getValue() {


		return this.value;
	}


	public void setSource(@Nullable Object source) {


		this.source = source;
	}

	@Override
	@Nullable
	public Object getSource() {


		return this.source;
	}
	@Override
	public boolean equals(@Nullable Object other) {


		if (this == other) {


			return true;
		}
		if (!(other instanceof BeanMetadataAttribute)) {


			return false;
		}
		BeanMetadataAttribute otherMa = (BeanMetadataAttribute) other;
		return (this.name.equals(otherMa.name) &&
				ObjectUtils.nullSafeEquals(this.value, otherMa.value) &&
				ObjectUtils.nullSafeEquals(this.source, otherMa.source));
	}

	@Override
	public int hashCode() {


		return this.name.hashCode() * 29 + ObjectUtils.nullSafeHashCode(this.value);
	}

	@Override
	public String toString() {


		return "metadata attribute '" + this.name + "'";
	}

}
AttributeAccessor属性访问器
这个就是定义了属性的操作接口,增删改查,获取所有的。
public interface AttributeAccessor {


	void setAttribute(String name, @Nullable Object value);

	@Nullable
	Object getAttribute(String name);

	@Nullable
	Object removeAttribute(String name);

	boolean hasAttribute(String name);

	String[] attributeNames();

}
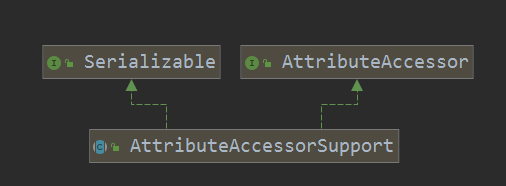
AttributeAccessorSupport属性访问抽象实现类

这个是对AttributeAccessor接口的抽象实现,定义了一个map来存放名字和属性的映射关系。
public abstract class AttributeAccessorSupport implements AttributeAccessor, Serializable {


	//名字和属性的对应
	private final Map<String, Object> attributes = new LinkedHashMap<>();

	//设置null就会删除
	@Override
	public void setAttribute(String name, @Nullable Object value) {


		Assert.notNull(name, "Name must not be null");
		if (value != null) {


			this.attributes.put(name, value);
		}
		else {


			removeAttribute(name);
		}
	}

	@Override
	@Nullable
	public Object getAttribute(String name) {


		Assert.notNull(name, "Name must not be null");
		return this.attributes.get(name);
	}

	@Override
	@Nullable
	public Object removeAttribute(String name) {


		Assert.notNull(name, "Name must not be null");
		return this.attributes.remove(name);
	}

	@Override
	public boolean hasAttribute(String name) {


		Assert.notNull(name, "Name must not be null");
		return this.attributes.containsKey(name);
	}

	@Override
	public String[] attributeNames() {


		return StringUtils.toStringArray(this.attributes.keySet());
	}
	//属性的复制
	protected void copyAttributesFrom(AttributeAccessor source) {


		Assert.notNull(source, "Source must not be null");
		String[] attributeNames = source.attributeNames();
		for (String attributeName : attributeNames) {


			setAttribute(attributeName, source.getAttribute(attributeName));
		}
	}

	//得同一个属性对象,或者每一个属性都相同
	@Override
	public boolean equals(@Nullable Object other) {


		return (this == other || (other instanceof AttributeAccessorSupport &&
				this.attributes.equals(((AttributeAccessorSupport) other).attributes)));
	}
	//map的hashCode
	@Override
	public int hashCode() {


		return this.attributes.hashCode();
	}

}
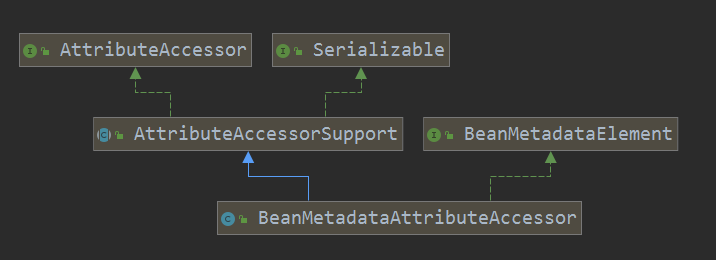
BeanMetadataAttributeAccessor元数据属性访问器

既能获取源数据,也能提供属性访问:
@SuppressWarnings("serial")
public class BeanMetadataAttributeAccessor extends AttributeAccessorSupport implements BeanMetadataElement {


	//bean的源数据对象
	@Nullable
	private Object source;


	public void setSource(@Nullable Object source) {


		this.source = source;
	}

	@Override
	@Nullable
	public Object getSource() {


		return this.source;
	}
	//添加进来的就是BeanMetadataAttribute
	public void addMetadataAttribute(BeanMetadataAttribute attribute) {


		super.setAttribute(attribute.getName(), attribute);
	}

	//获得之后都会转成BeanMetadataAttribute
	@Nullable
	public BeanMetadataAttribute getMetadataAttribute(String name) {


		return (BeanMetadataAttribute) super.getAttribute(name);
	}
	//封装成BeanMetadataAttribute
	@Override
	public void setAttribute(String name, @Nullable Object value) {


		super.setAttribute(name, new BeanMetadataAttribute(name, value));
	}

	@Override
	@Nullable
	public Object getAttribute(String name) {


		BeanMetadataAttribute attribute = (BeanMetadataAttribute) super.getAttribute(name);
		return (attribute != null ? attribute.getValue() : null);
	}

	@Override
	@Nullable
	public Object removeAttribute(String name) {


		BeanMetadataAttribute attribute = (BeanMetadataAttribute) super.removeAttribute(name);
		return (attribute != null ? attribute.getValue() : null);
	}

}
BeanDefinition
我们的bean定义接口就是继承他们的,也就是说,我们的bean定义得有来源BeanMetadataElement,得可以操作AttributeAccessor。比如我给你一个类,你要将他转换成bean,你到知道他的一些信息吧,不然等于什么都没有,别说获取注解什么的了,当然同时可能这些信息不够,所以要扩展,可以设置任务属性,只要是我需要的。我想spring的bean定义的意图也差不多吧。

主要方法
代码就不贴了,说一些熟悉方法,其他还有很多,要看的时候可以切过去看:
//单例字符串singleton
String SCOPE_SINGLETON = ConfigurableBeanFactory.SCOPE_SINGLETON;

//原型字符串prototype
String SCOPE_PROTOTYPE = ConfigurableBeanFactory.SCOPE_PROTOTYPE;

//设置bean类名字,这个可能会在后置处理器中修改,比如用了GCLIB代理配置类的时候就会改
void setBeanClassName(@Nullable String beanClassName);

//设置范围,是单例,还是原型
void setScope(@Nullable String scope);

//设置是否是懒加载
void setLazyInit(boolean lazyInit);

//设置需要先加载的依赖的类名字数组
void setDependsOn(@Nullable String... dependsOn);

//设置是否适合给其他类做自动装配
void setAutowireCandidate(boolean autowireCandidate);

//设置是否优先自动装配
void setPrimary(boolean primary);

//设置FactoryBean的名字
void setFactoryBeanName(@Nullable String factoryBeanName);

//获取构造函数的参数
ConstructorArgumentValues getConstructorArgumentValues();

//设置初始化方法 对应@PostConstruct
void setInitMethodName(@Nullable String initMethodName);

//设置销毁时候的方法 对应@PreDestroy
void setDestroyMethodName(@Nullable String destroyMethodName);
可以看到,我们的bean定义是一步步来的,首先是定义这个bean的来源,然后是一些属性操作,然后是将两部分合起来作为bean定义的父接口,在这个基础上,再定义其他的一些操作。这样数据和操作接口分离,做到了很好的解耦和扩展。
好了,今天就到这里了,希望对学习理解有帮助,大神看见勿喷,仅为自己的学习理解,能力有限,请多包涵。