有道无术,术尚可求,有术无道,止于术。
版本說明:
spring-boot:2.6.3
spring-cloud:2021.0.1
spring-cloud-alibaba:2.2.8.RELEASE
Nacos:2.1.1
文章目录
-
- 前言
-
- 加载日志系统
-
- 启动Grpc 客户端
-
- 自动配置类
-
- NacosWatch
-
- 自动注册
前言
紧接上篇,接下来分析下客户端自动注册的流程。
1. 加载日志系统
Spring Boot开启启动,会加载spring.factories中的自动配置类:
- NacosDiscoveryAutoConfiguration
- RibbonNacosAutoConfiguration
- NacosDiscoveryEndpointAutoConfiguration
- NacosServiceRegistryAutoConfiguration
- NacosReactiveDiscoveryClientConfiguration
- NacosConfigServerAutoConfiguration
- NacosDiscoveryClientConfigServiceBootstrapConfiguration
- NacosDiscoveryAutoConfiguration
在环境准备阶段,NacosLoggingListener监听器首先工作,因为它监听的事件是ApplicationEnvironmentPreparedEvent,其作用是加载日志系统:
 public void onApplicationEvent(ApplicationEvent applicationEvent) {


        // 如果存在logback相关的类,加载logback日志系统LogbackNacosLogging,否则使用Log4J2NacosLogging,然后加载配置
        NacosLogging.getInstance().loadConfiguration();
    }
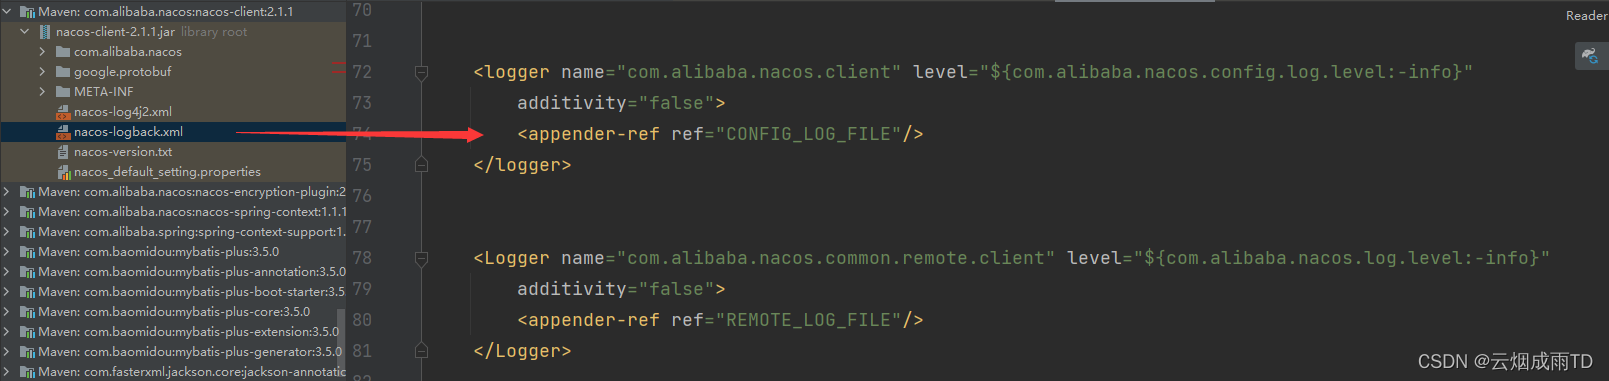
在加载配置的最后阶段,可以看到其读取了classpath:nacos-logback.xm日志配置文件,并创建了一个LoggerContext日志上下文:
    private LoggerContext loadConfigurationOnStart() {


        String location = this.getLocation("classpath:nacos-logback.xml");
        try {


            LoggerContext loggerContext = (LoggerContext)StaticLoggerBinder.getSingleton().getLoggerFactory();
            NacosJoranConfigurator configurator = new NacosJoranConfigurator();
            configurator.setContext(loggerContext);
            configurator.doNacosConfigure(ResourceUtils.getResourceUrl(location));
            return loggerContext;
        } catch (Exception var4) {


            throw new IllegalStateException("Could not initialize Logback Nacos logging from " + location, var4);
        }
    }
而这个时候,当前应用对应的日志系统都还没有加载,所以Nacos客户端的一些日志级别配置,需要在源码配置文件中修改,或者通过JVM启动参数才能起效:
2. 启动Grpc 客户端
Nacos 2.x采用Grpc通信,gRPC是由google开发的一个高性能、通用的开源RPC框架,主要面向移动应用开发且基于HTTP/2协议标准而设计,同时支持大多数流行的编程语言。
使用gRPC框架,需要开启客户端和服务端,可以在GitHub学习下,这里就不再研究了。
GrpcSdkClient就是Nacos 进行通信的客户端,利用Grpc来实现服务器连接、消息处理等功能,启动逻辑在其start()方法中。在方法中会创建一些定时任务,以及和Nacos服务端中的GrpcSdkServer建立长连接。
3. 自动配置类
接着开始进行自动配置,注入配置类及Bean 对象,首先是服务管理器:
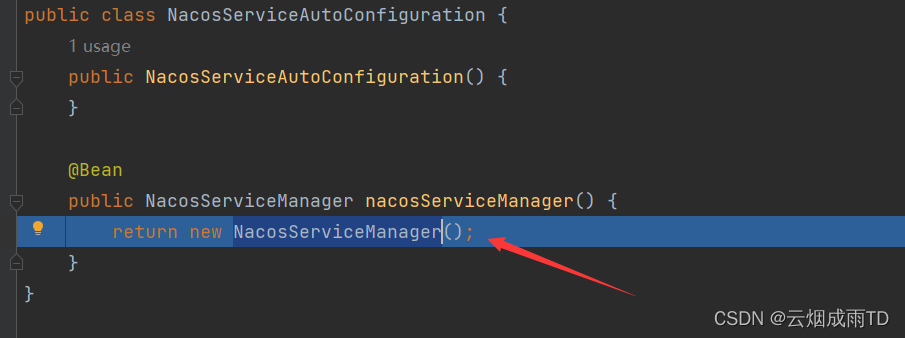
接着是配置类:
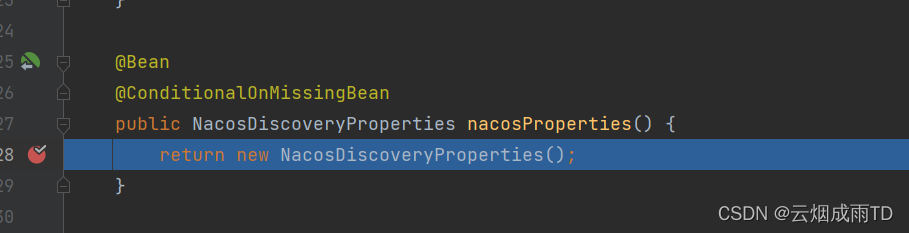
服务发现功能类:

服务发现客户端:

整个生命周期监测者NacosWatch:
等等。。。其他类就不一一介绍了。
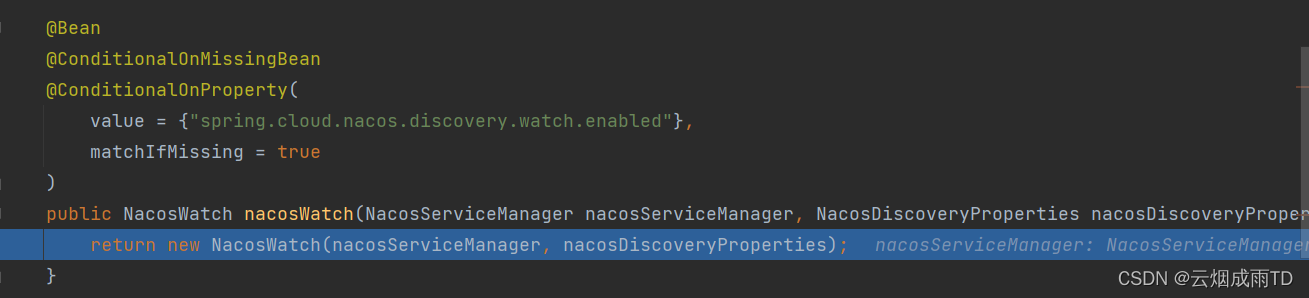
4. NacosWatch
在NacosDiscoveryClientConfiguration自动配置类中,注册了NacosWatch。
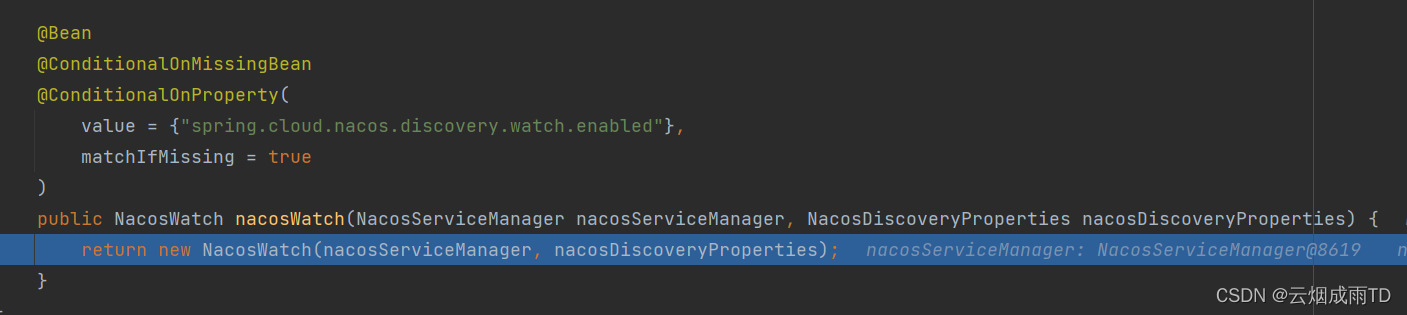
调用NacosWatch构造方法:
    public NacosWatch(NacosServiceManager nacosServiceManager, NacosDiscoveryProperties properties) {


    	// 服务管理器
        this.nacosServiceManager = nacosServiceManager;
        // YML 配置
        this.properties = properties;
        // 多线程定时任务
        this.taskScheduler = getTaskScheduler();
    }
NacosWatch实现了ApplicationEventPublisherAware接口,作用是获取初始化事件发布器:

NacosWatch还实现了SmartLifecycle,该接口主要是作用是所有的bean都创建完成之后,可以执行初始化操作,在退出时执行资源销毁工作。
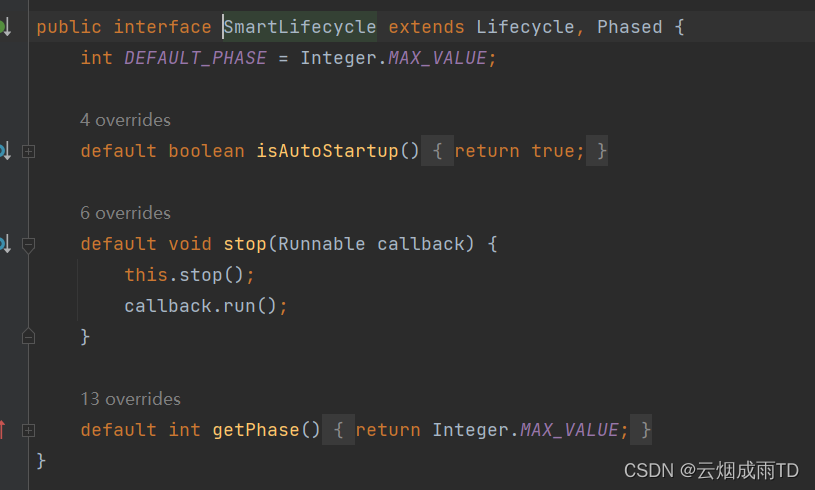
所以在应用启动后,执行重写了SmartLifecycle的start()方法:
    public void start() {


        if (this.running.compareAndSet(false, true)) {


            // 添加名称为app-service001:DEFAULT_GROUP 的监听器
            EventListener eventListener = (EventListener)this.listenerMap.computeIfAbsent(this.buildKey(), (event) -> {


                return new EventListener() {


                    public void onEvent(Event event) {


                        if (event instanceof NamingEvent) {


                            List instances = ((NamingEvent)event).getInstances();
                            Optional instanceOptional = NacosWatch.this.selectCurrentInstance(instances);
                            instanceOptional.ifPresent((currentInstance) -> {


                                NacosWatch.this.resetIfNeeded(currentInstance);
                            });
                        }

                    }
                };
            });
            // 获取NamingService
            NamingService namingService = this.nacosServiceManager.getNamingService(this.properties.getNacosProperties());

            try {


            	// 订阅事件
                namingService.subscribe(this.properties.getService(), this.properties.getGroup(), Arrays.asList(this.properties.getClusterName()), eventListener);
            } catch (Exception var4) {


                log.error("namingService subscribe failed, properties:{}", this.properties, var4);
            }
			// 定时任务去发布心跳事件
            this.watchFuture = this.taskScheduler.scheduleWithFixedDelay(this::nacosServicesWatch, this.properties.getWatchDelay());
        }

    }
5. 自动注册
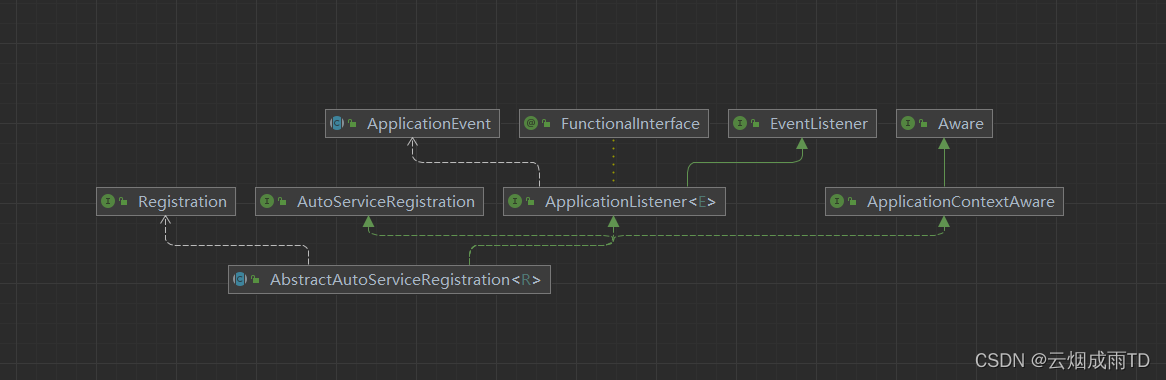
自动注册由NacosAutoServiceRegistration类来完成,继承了AbstractAutoServiceRegistration抽象类,类关系图如下:
实现了监听器接口,监听WebServerInitializedEvent事件,所以在Web容器初始化完成后,会进入到onApplicationEvent 方法:
    public void onApplicationEvent(WebServerInitializedEvent event) {


        this.bind(event);
    }
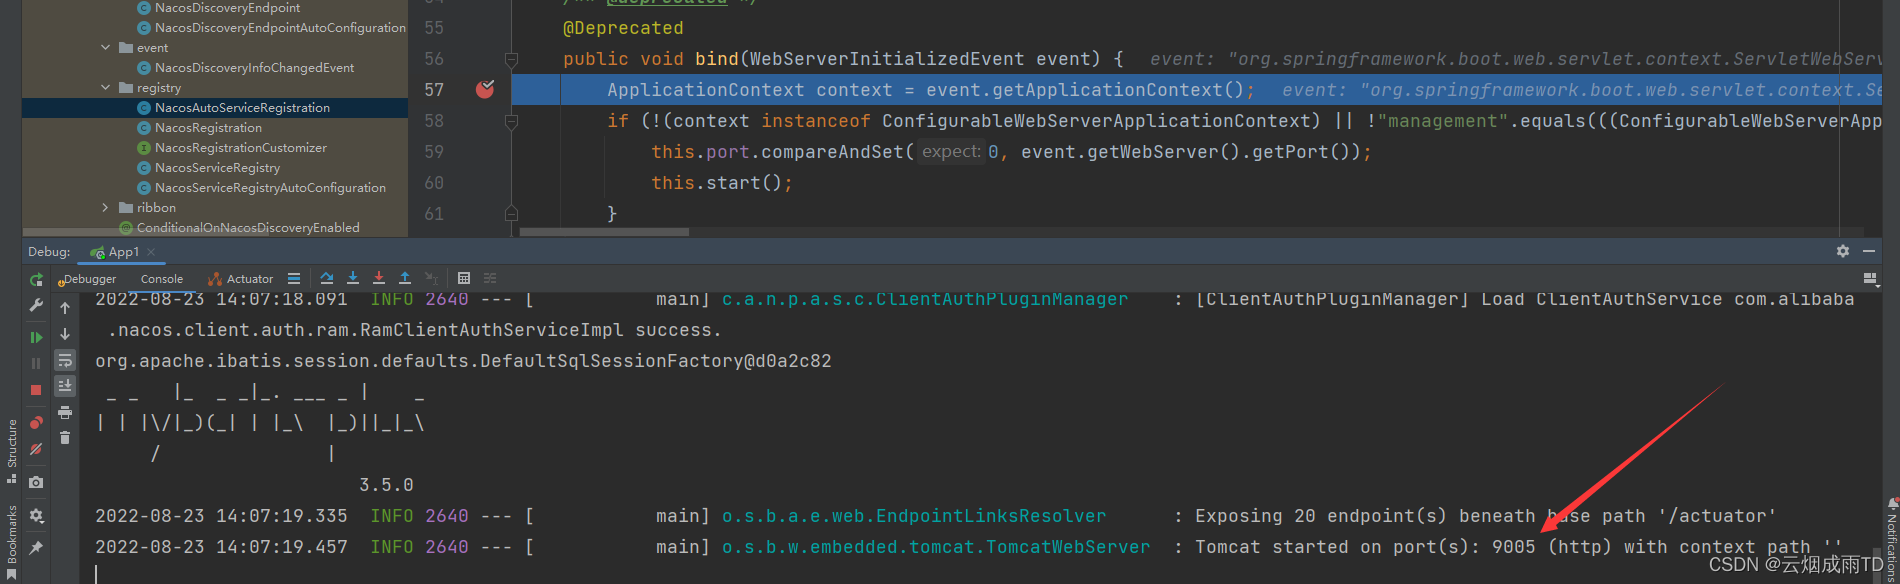
接着进入到AbstractAutoServiceRegistration的bind()方法:
    @Deprecated
    public void bind(WebServerInitializedEvent event) {


        // 获取上下文
        ApplicationContext context = event.getApplicationContext();
        if (!(context instanceof ConfigurableWebServerApplicationContext) || !"management".equals(((ConfigurableWebServerApplicationContext)context).getServerNamespace())) {


            // 设置端口为程序启动端口
            this.port.compareAndSet(0, event.getWebServer().getPort());
            // 调用开始方法:
            this.start();
        }
    }
在start()方法中,调用注册方法,并发布一些事件和日志:
    public void start() {


        // 没有开启自动注册,打印debug 日志
        if (!this.isEnabled()) {


            if (logger.isDebugEnabled()) {


                logger.debug("Discovery Lifecycle disabled. Not starting");
            }

        } else {


            if (!this.running.get()) {

      // 开始标记,最初为false
                // 发布实例预注册事件
                this.context.publishEvent(new InstancePreRegisteredEvent(this, this.getRegistration()));
                // 开始注册
                this.register();
                if (this.shouldRegisterManagement()) {


                    this.registerManagement();
                }
                // 发布实例注册完成事件
                this.context.publishEvent(new InstanceRegisteredEvent(this, this.getConfiguration()));
                this.running.compareAndSet(false, true);
            }

        }
    }
    // 调用服务注册器进行注册
    protected void register() {


        this.serviceRegistry.register(this.getRegistration());
    }
注册方法,调用的是NacosServiceRegistry的register(Registration registration)方法:
        public void register(Registration registration) {


        // 服务名为空,打印警告日志
        if (StringUtils.isEmpty(registration.getServiceId())) {


            log.warn("No service to register for nacos client...");
        } else {


            NamingService namingService = this.namingService();// // NamingService
            String serviceId = registration.getServiceId(); // 服务名=>app-service001
            String group = this.nacosDiscoveryProperties.getGroup();// 配置的分组,默认 DEFAULT_GROUP
            // 创建实例对象
            Instance instance = this.getNacosInstanceFromRegistration(registration);
            try {


                // 调用NamingService 注册实例
                namingService.registerInstance(serviceId, group, instance);
                log.info("nacos registry, {} {} {}:{} register finished", new Object[]{

     group, serviceId, instance.getIp(), instance.getPort()});
            } catch (Exception var7) {


                if (this.nacosDiscoveryProperties.isFailFast()) {


                    log.error("nacos registry, {} register failed...{},", new Object[]{

     serviceId, registration.toString(), var7});
                    ReflectionUtils.rethrowRuntimeException(var7);
                } else {


                    log.warn("Failfast is false. {} register failed...{},", new Object[]{

     serviceId, registration.toString(), var7});
                }
            }

        }
    }
在获取实例的方法中,可以看到设置了很多实例信息:
private Instance getNacosInstanceFromRegistration(Registration registration) {


        Instance instance = new Instance();
        instance.setIp(registration.getHost()); // 当前服务IP=》192.168.142.1
        instance.setPort(registration.getPort()); // 启动端口=》 9005
        instance.setWeight((double)this.nacosDiscoveryProperties.getWeight()); // 权重=》1.0
        instance.setClusterName(this.nacosDiscoveryProperties.getClusterName()); // 集群名称=》DEFAULT
        instance.setEnabled(this.nacosDiscoveryProperties.isInstanceEnabled()); // 是否主动注册的实例
        instance.setMetadata(registration.getMetadata()); // 元数据
        instance.setEphemeral(this.nacosDiscoveryProperties.isEphemeral()); // 临时实例还是永久实例
        return instance;
    }
在注册实例registerInstance方法中,会调用客户端代理进行注册:
        public void registerInstance(String serviceName, String groupName, Instance instance) throws NacosException
        // 检查是否合法:心跳时间、服务剔除时间、集群名称是否合法
        // 心跳机制:
        //  Nacos Server会开启一个定时任务用来检查注册服务实例的健康状况,
        //  对于超过15s没有收到客户端心跳的实例会将它的healthy属性设置为false(客户端服务发现时不会发现)。
        //  如果某个实例超过30秒没有收到心跳,直接剔除该实例(被剔除的实例如果恢复发送心跳则会重新注册)
        NamingUtils.checkInstanceIsLegal(instance);
        // 调用客户端代理进行注册
        this.clientProxy.registerService(serviceName, groupName, instance);
    }
		// 获取客户端执行代理进行注册
        public void registerService(String serviceName, String groupName, Instance instance) throws NacosException {


            this.getExecuteClientProxy(instance).registerService(serviceName, groupName, instance);
    }
获取到的通信注册客户端为NamingGrpcClientProxy:
    // 获取执行客户端代理,如果是临时实例,则会使用RPC,不是则使用HTTP。
    // 通信层统一到 gRPC 协议,同时完善了客户端和服务端的流量控制和负载均衡能力,提升的整体吞吐。
    // 由于通信使用了 RPC 方式,因此某一客户端的所有请求(无论是注册还是订阅)都通过同一个链接和同一个服务节点进行,不像之前通过 HTTP 连接可能每次请求都请求在不同的 Nacos 节点上,这就导致了服务发现的数据内容由原来的无状态化变为了与连接状态绑定的一种有状态数据。
    private NamingClientProxy getExecuteClientProxy(Instance instance) {


            return (NamingClientProxy)(instance.isEphemeral() ? this.grpcClientProxy : this.httpClientProxy);
    }
NamingGrpcClientProxy 缓存实例信息,接着继续注册:
    public void registerService(String serviceName, String groupName, Instance instance) throws NacosException {


        LogUtils.NAMING_LOGGER.info("[REGISTER-SERVICE] {} registering service {} with instance {}", new Object[]{

     this.namespaceId, serviceName, instance});
        // 缓存放入内存ConcurrentMap,DEFAULT_GROUP@@app-service001=》实例信息
        this.redoService.cacheInstanceForRedo(serviceName, groupName, instance);
        // 调用客户端注册
        this.doRegisterService(serviceName, groupName, instance);
    }
最终,发送gprc请求到服务端,客户端完成注册:
public void doRegisterService(String serviceName, String groupName, Instance instance) throws NacosException {


        // 创建请求对象
        InstanceRequest request = new InstanceRequest(this.namespaceId, serviceName, groupName, "registerInstance", instance);
        // 发送请求到服务端
        this.requestToServer(request, Response.class);
        this.redoService.instanceRegistered(serviceName, groupName);
    }
    private <T extends Response> T requestToServer(AbstractNamingRequest request, Class<T> responseClass) throws NacosException {


        try {


            // 处理注册中心设置权限时,需要携带认证消息头的情况
            request.putAllHeader(this.getSecurityHeaders(request.getNamespace(), request.getGroupName(), request.getServiceName()));
            Response response = this.requestTimeout < 0L ? this.rpcClient.request(request) : this.rpcClient.request(request, this.requestTimeout);
            // 处理响应结果
            if (ResponseCode.SUCCESS.getCode() != response.getResultCode()) {


                throw new NacosException(response.getErrorCode(), response.getMessage());
            }
            if (responseClass.isAssignableFrom(response.getClass())) {


                return response;
            }

            LogUtils.NAMING_LOGGER.error("Server return unexpected response '{}', expected response should be '{}'", response.getClass().getName(), responseClass.getName());
        } catch (NacosException var4) {


            throw var4;
        } catch (Exception var5) {


            throw new NacosException(500, "Request nacos server failed: ", var5);
        }

        throw new NacosException(500, "Server return invalid response");
    }
可以在控制台看到打印的注册日志:

版权声明:本文不是「本站」原创文章,版权归原作者所有 | 原文地址: