SpringCloud无介绍快使用,集群cloud-provider-payment8002搭建(十二)
- 问题背景
- 服务集群搭建
- Lyric: 接下来为您播放的是
问题背景
从零开始学springcloud微服务项目
注意事项:
- 约定 > 配置 > 编码
- IDEA版本2021.1
- 这个项目,我分了很多篇章,每篇文章一个操作步骤,目的是显得更简单明了
- controller调service,service调dao
- 项目源码以及sentinel安装包
服务集群搭建
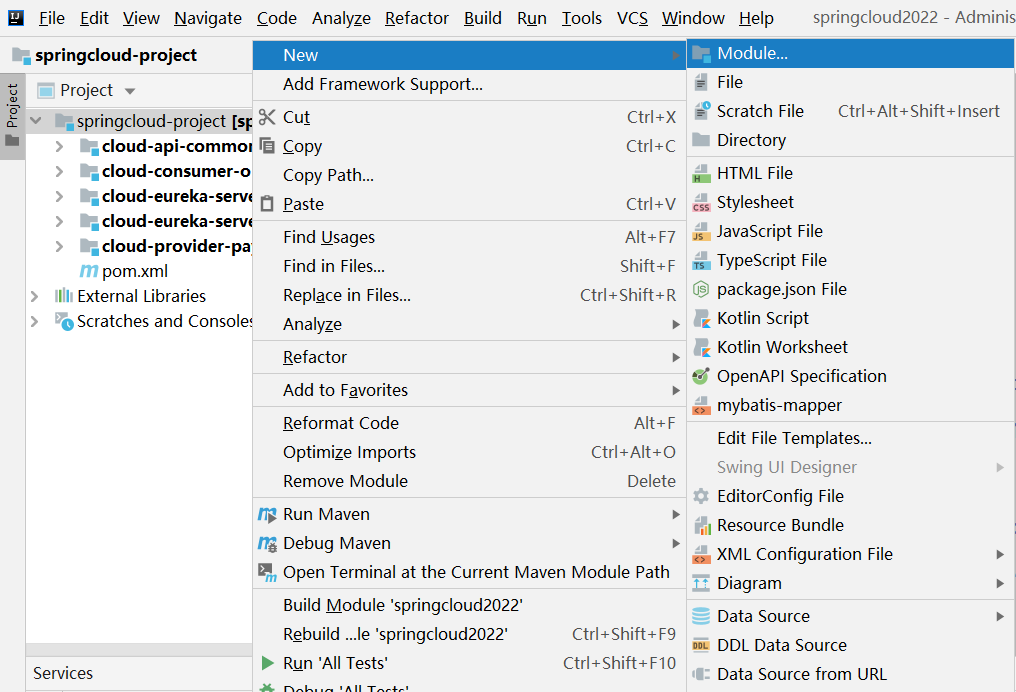
1cloud-provider-payment8002子模块module创建
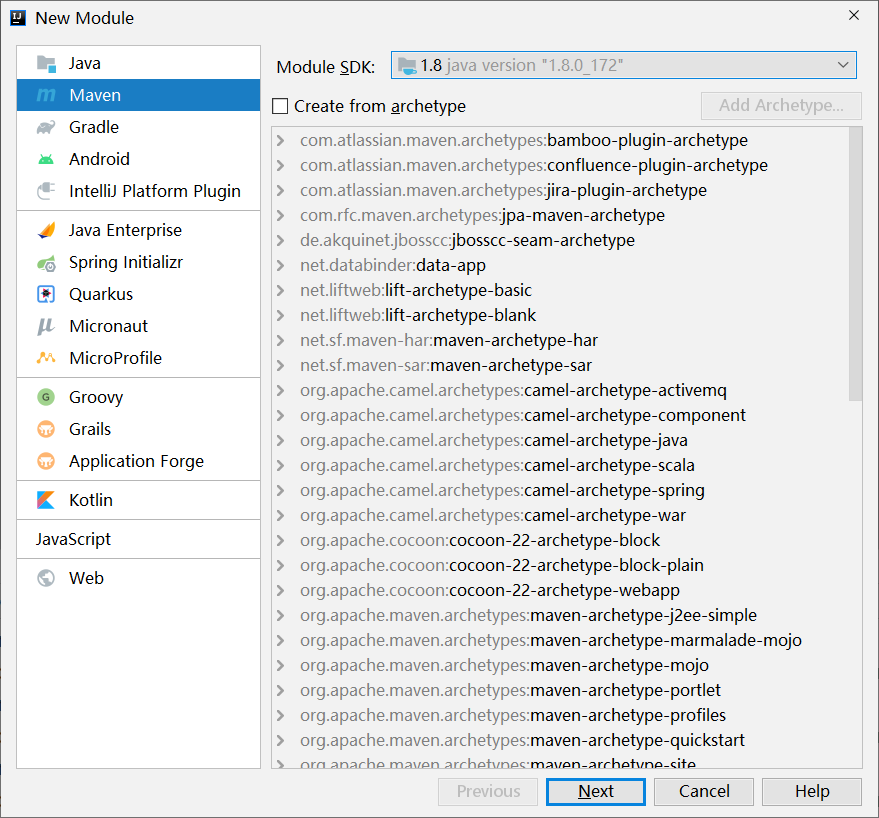
2选择jdk1.8
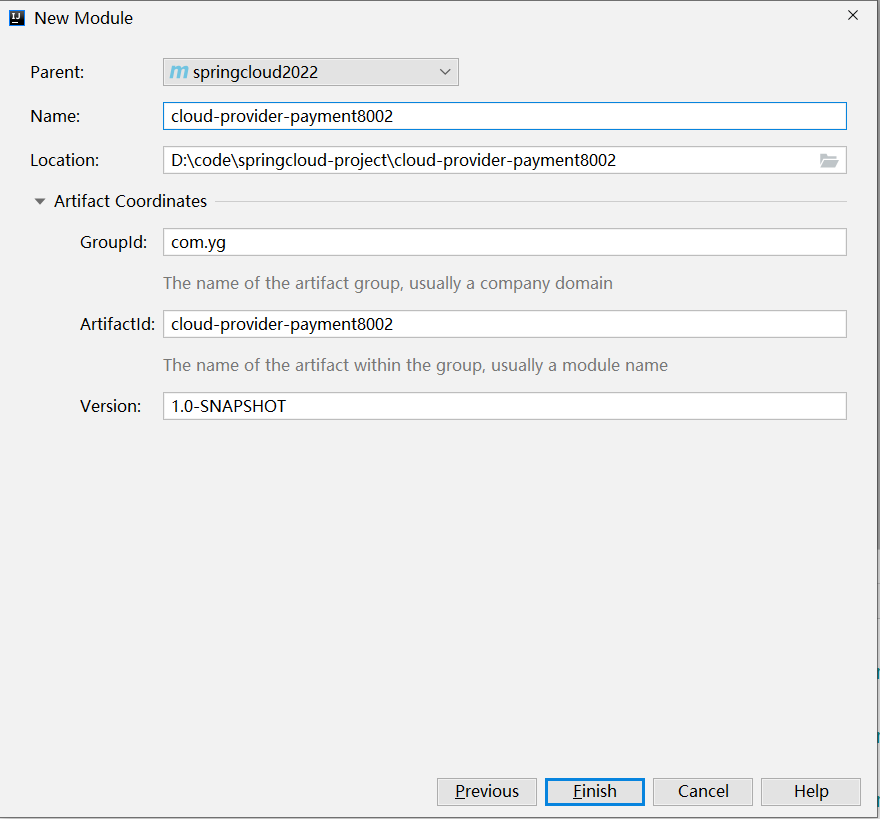
3输入服务名:cloud-provider-payment8002
4导入依赖
<?xml version="1.0" encoding="UTF-8"?>
<project xmlns="http://maven.apache.org/POM/4.0.0"
         xmlns:xsi="http://www.w3.org/2001/XMLSchema-instance"
         xsi:schemaLocation="http://maven.apache.org/POM/4.0.0 http://maven.apache.org/xsd/maven-4.0.0.xsd">
    <parent>
        <artifactId>springcloud2022</artifactId>
        <groupId>com.yg</groupId>
        <version>1.0-SNAPSHOT</version>
    </parent>
    <modelVersion>4.0.0</modelVersion>

    <artifactId>cloud-provider-payment8002</artifactId>

    <dependencies>
        <!--eureka-client-->
        <dependency>
            <groupId>org.springframework.cloud</groupId>
            <artifactId>spring-cloud-starter-netflix-eureka-client</artifactId>
        </dependency>
        <dependency><!-- 引入自己定义的api通用包,可以使用Payment支付Entity -->
            <groupId>com.yg</groupId>
            <artifactId>cloud-api-commons</artifactId>
            <version>${project.version}</version>
        </dependency>
        <dependency>
            <groupId>org.springframework.boot</groupId>
            <artifactId>spring-boot-starter-web</artifactId>
        </dependency>
        <dependency>
            <groupId>org.springframework.boot</groupId>
            <artifactId>spring-boot-starter-actuator</artifactId>
        </dependency>
        <dependency>
            <groupId>org.mybatis.spring.boot</groupId>
            <artifactId>mybatis-spring-boot-starter</artifactId>
        </dependency>
        <dependency>
            <groupId>com.alibaba</groupId>
            <artifactId>druid-spring-boot-starter</artifactId>
            <version>1.1.10</version>
        </dependency>
        <!--mysql-connector-java-->
        <dependency>
            <groupId>mysql</groupId>
            <artifactId>mysql-connector-java</artifactId>
        </dependency>
        <!--jdbc-->
        <dependency>
            <groupId>org.springframework.boot</groupId>
            <artifactId>spring-boot-starter-jdbc</artifactId>
        </dependency>
        <dependency>
            <groupId>org.springframework.boot</groupId>
            <artifactId>spring-boot-devtools</artifactId>
            <!--            <scope>runtime</scope>-->
            <optional>true</optional>
        </dependency>
        <dependency>
            <groupId>org.projectlombok</groupId>
            <artifactId>lombok</artifactId>
            <optional>true</optional>
        </dependency>
        <dependency>
            <groupId>org.springframework.boot</groupId>
            <artifactId>spring-boot-starter-test</artifactId>
            <scope>test</scope>
        </dependency>
    </dependencies>

</project>
5添加application.yml文件
server:
  port: 8002

spring:
  application:
    name: cloud-payment-service
  datasource:
    #type: com.alibaba.druid.pool.DruidDataSource            # 当前数据源操作类型
    driver-class-name: com.mysql.cj.jdbc.Driver              # mysql驱动包
    url: jdbc:mysql://localhost:3306/mysqltest?useUnicode=true&characterEncoding=utf-8&useSSL=false&serverTimezone=Asia/Shanghai
    username: root
    password: 123456
eureka:
  client:
    #表示是否将自己注册进EurekaServer默认为true。
    register-with-eureka: true
    #是否从EurekaServer抓取已有的注册信息,默认为true。单节点无所谓,集群必须设置为true才能配合ribbon使用负载均衡
    fetchRegistry: true
    service-url:
      #defaultZone: http://localhost:7001/eureka
      defaultZone: http://eureka7001.com:7001/eureka,http://eureka7002.com:7002/eureka

mybatis:
  mapperLocations: classpath:mapper/*.xml
  type-aliases-package: com.yg.springcloud.entities    # 所有Entity别名类所在包
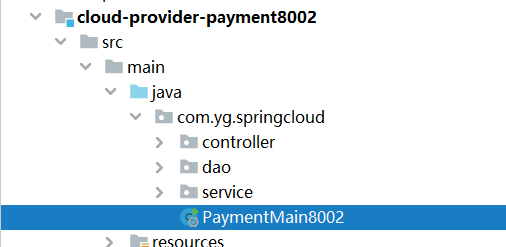
6复制服务cloud-provider-payment8001的业务代码到cloud-provider-payment8002,更改启动类的类名
7修改cloud-provider-payment8001和cloud-provider-payment8002的PaymentController,更改从yml中获取服务端口
package com.yg.springcloud.controller;

import com.yg.springcloud.entities.CommonResult;
import com.yg.springcloud.entities.Payment;
import com.yg.springcloud.service.PaymentService;
import lombok.extern.slf4j.Slf4j;
import org.springframework.beans.factory.annotation.Value;
import org.springframework.web.bind.annotation.*;

import javax.annotation.Resource;

/**
 * @Author suolong
 * @Date 2022/6/14 21:36
 * @Version 2.0
 */
@RestController
@Slf4j
public class PaymentController {


    @Value("${server.port}")
    private String serverPort;

    @Resource
    private PaymentService paymentService;

    @PostMapping(value = "/payment/create")
    public CommonResult create(@RequestBody Payment payment) {


        int result = paymentService.create(payment);
        log.info("result哈哈哈: {}", result);
        if (result > 0) {


            return new CommonResult(200, "插入成功", result);
        }
        return new CommonResult(500, "插入失败", null);
    }

    @GetMapping(value = "/payment/get/{id}")
    public CommonResult<Payment> getPaymentById(@PathVariable("id") Long id) {


        Payment payment = paymentService.getPaymentById(id);
        log.info("查询结果哈哈哈hahah:{}", payment);
        if (payment != null) {


            return new CommonResult(200, "查询成功哈: " + serverPort, payment);
        } else {


            return new CommonResult(500, "没有对应记录,查询ID: " + id, null);
        }
    }

}
8修改cloud-consumer-order80中的OrderController的PaymentSrv_URL的地址
public static final String PaymentSrv_URL = "http://CLOUD-PAYMENT-SERVICE";
在ApplicationContextConfig中添加注解@LoadBalanced,进行负载均衡Ribbon
package com.yg.springcloud.config;

import org.springframework.cloud.client.loadbalancer.LoadBalanced;
import org.springframework.context.annotation.Bean;
import org.springframework.context.annotation.Configuration;
import org.springframework.web.client.RestTemplate;

/**
 * @Author suolong
 * @Date 2022/6/15 20:53
 * @Version 2.0
 */
@Configuration
public class ApplicationContextConfig {


    @Bean
    @LoadBalanced // 使用@LoadBalanced注解赋予RestTemplate负载均衡的能力
    public RestTemplate restTemplate()
    {


        return new RestTemplate();
    }

}
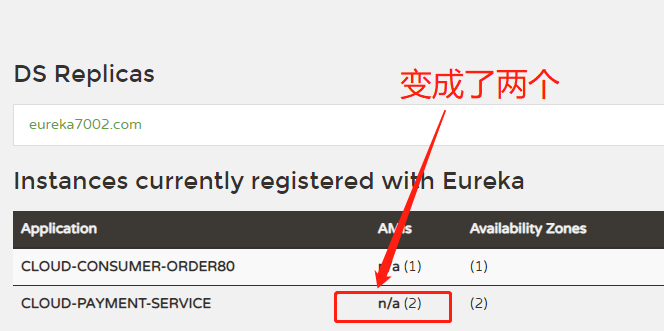
9先启动EurekaService,在启动其他所有服务:http://eureka7001.com:7001/
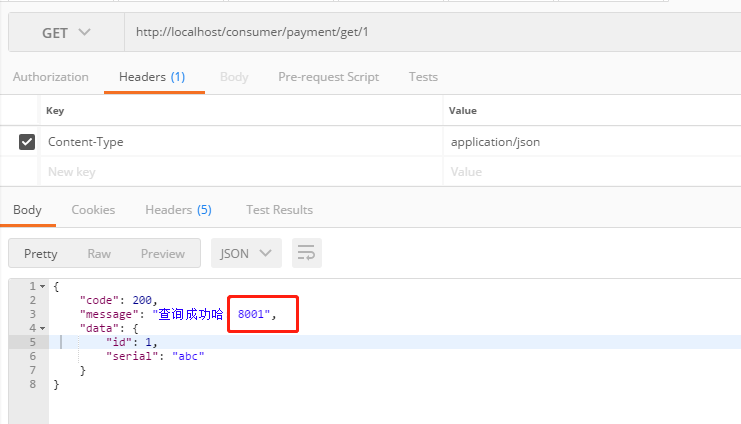
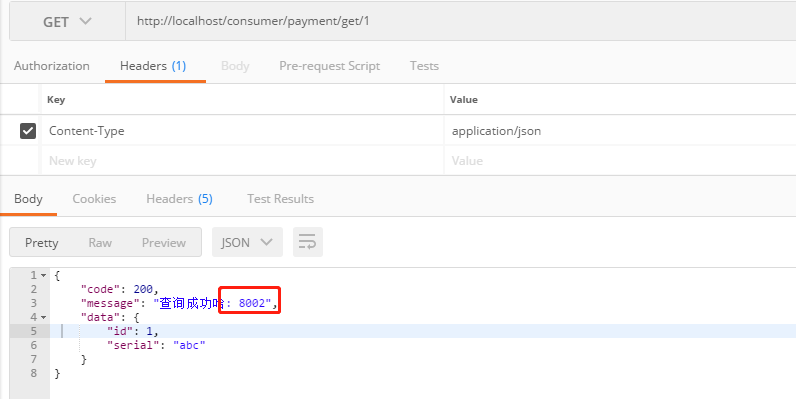
10查询两次,实现负载均衡:http://localhost/consumer/payment/get/1
第一次使用的8001端口
第二次使用的8002端口
11由此可见restTemplate可以直接使用服务名进行调用
public String PaymentSrv_URL = "http://CLOUD-PAYMENT-SERVICE";
restTemplate.postForObject(PaymentSrv_URL + "/payment/create", payment, CommonResult.class);
12actuator更改主机名称,显示ip,更改yml
cloud-consumer-order80
server:
  port: 80
spring:
  application:
    name: cloud-consumer-order80
eureka:
  client:
    #表示是否将自己注册进EurekaServer默认为true。
    register-with-eureka: true
    #是否从EurekaServer抓取已有的注册信息,默认为true。单节点无所谓,集群必须设置为true才能配合ribbon使用负载均衡
    fetchRegistry: true
    service-url:
      #defaultZone: http://localhost:7001/eureka
      defaultZone: http://eureka7001.com:7001/eureka,http://eureka7002.com:7002/eureka
  instance:
    instance-id: order80
    prefer-ip-address: true     #访问路径可以显示IP地址
cloud-payment-service8002
server:
  port: 8002

spring:
  application:
    name: cloud-payment-service
  datasource:
    #type: com.alibaba.druid.pool.DruidDataSource            # 当前数据源操作类型
    driver-class-name: com.mysql.cj.jdbc.Driver              # mysql驱动包
    url: jdbc:mysql://localhost:3306/mysqltest?useUnicode=true&characterEncoding=utf-8&useSSL=false&serverTimezone=Asia/Shanghai
    username: root
    password: 123456
eureka:
  client:
    #表示是否将自己注册进EurekaServer默认为true。
    register-with-eureka: true
    #是否从EurekaServer抓取已有的注册信息,默认为true。单节点无所谓,集群必须设置为true才能配合ribbon使用负载均衡
    fetchRegistry: true
    service-url:
      #defaultZone: http://localhost:7001/eureka
      defaultZone: http://eureka7001.com:7001/eureka,http://eureka7002.com:7002/eureka
  instance:
    instance-id: payment8002
    prefer-ip-address: true     #访问路径可以显示IP地址

mybatis:
  mapperLocations: classpath:mapper/*.xml
  type-aliases-package: com.yg.springcloud.entities    # 所有Entity别名类所在包
cloud-payment-service8001
server:
  port: 8001

spring:
  application:
    name: cloud-payment-service
  datasource:
    #type: com.alibaba.druid.pool.DruidDataSource            # 当前数据源操作类型
    driver-class-name: com.mysql.cj.jdbc.Driver              # mysql驱动包
    url: jdbc:mysql://localhost:3306/mysqltest?useUnicode=true&characterEncoding=utf-8&useSSL=false&serverTimezone=Asia/Shanghai
    username: root
    password: 123456
eureka:
  client:
    #表示是否将自己注册进EurekaServer默认为true。
    register-with-eureka: true
    #是否从EurekaServer抓取已有的注册信息,默认为true。单节点无所谓,集群必须设置为true才能配合ribbon使用负载均衡
    fetchRegistry: true
    service-url:
      #defaultZone: http://localhost:7001/eureka
      defaultZone: http://eureka7001.com:7001/eureka,http://eureka7002.com:7002/eureka
  instance:
    instance-id: payment8001
    prefer-ip-address: true     #访问路径可以显示IP地址

mybatis:
  mapperLocations: classpath:mapper/*.xml
  type-aliases-package: com.yg.springcloud.entities    # 所有Entity别名类所在包
12更改之后,查看服务名变化:http://eureka7001.com:7001/

SpringCloud无介绍快使用,Seata处理分布式事务(二十五)
SpringCloud无介绍快使用,sentinel服务熔断功能(二十四)
SpringCloud无介绍快使用,sentinel注解@SentinelResource的基本使用(二十三)
SpringCloud无介绍快使用,sentinel热点key限流与系统规则的基本使用(二十二)
SpringCloud无介绍快使用,sentinel熔断降级和限流的基本使用(二十一)
SpringCloud无介绍快使用,Nacos集群和Nginx代理(二十)
SpringCloud无介绍快使用,nacos配置中心的基本使用(十九)
SpringCloud无介绍快使用,nacos注册中心的基本使用(十八)
SpringCloud无介绍快使用,gateway通过微服务名实现动态路由(十七)
SpringCloud无介绍快使用,gateway的基本使用(十六)
SpringCloud无介绍快使用,Ribbon负载均衡工具与OpenFeign的使用(十五)
SpringCloud无介绍快使用,使用Zookeeper替换Eureka服务注册与发现(十四)
SpringCloud无介绍快使用,服务发现Discovery和Eureka自我保护(十三)
SpringCloud无介绍快使用,集群cloud-provider-payment8002搭建(十二)
SpringCloud无介绍快使用,集群Eureka服务注册中心cloud-eureka-server7002搭建(十一)
SpringCloud无介绍快使用,单机Eureka服务注册中心cloud-eureka-server7001搭建(十)
SpringCloud无介绍快使用,新建cloud-api-commons公共模块module(九)
SpringCloud无介绍快使用,新建子module消费者订单模块(八)
SpringCloud无介绍快使用,热部署devtools配置(七)
SpringCloud无介绍快使用,子module提供者支付微服务业务开发(六)
SpringCloud无介绍快使用,新建子module提供者支付微服务yml整合和新建启动类(五)
SpringCloud无介绍快使用,新建子module提供者支付微服务pom整合(四)
SpringCloud无介绍快使用,springcloud父工程pom文件整理(三)
SpringCloud无介绍快使用,IDEA新建springcloud父工程(二)
SpringCloud无介绍快使用,与Spingboot之间的兼容版本选择(一)
作为程序员第 179 篇文章,每次写一句歌词记录一下,看看人生有几首歌的时间,wahahaha …


