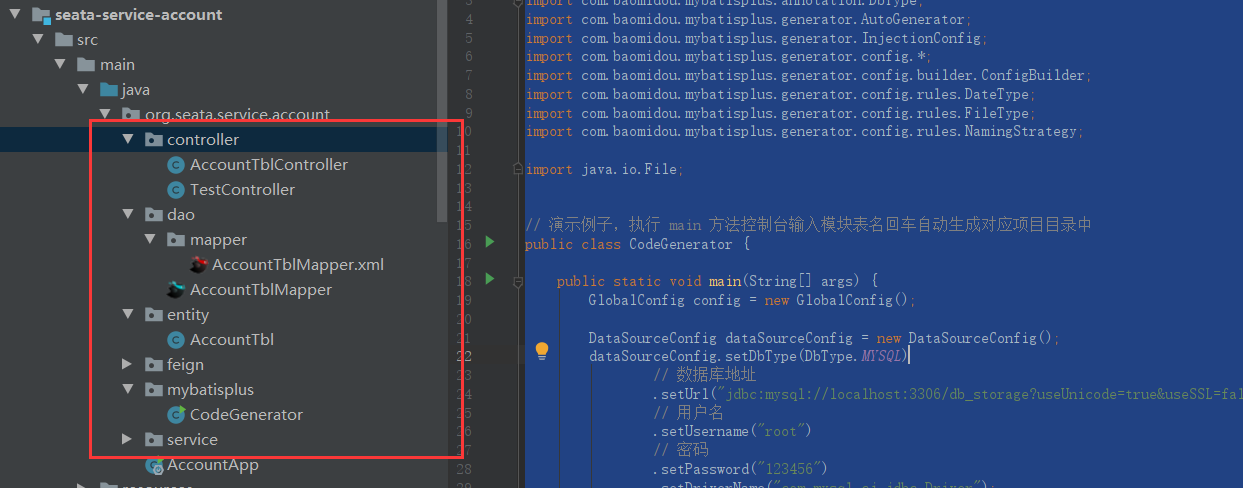
集成mybatisplus
准备数据
1、 新建三个数据库;

2、 分别导入表结构及数据;
account_tbl.sql
SET NAMES utf8mb4;
SET FOREIGN_KEY_CHECKS = 0;

-- ----------------------------
-- Table structure for account_tbl
-- ----------------------------
DROP TABLE IF EXISTS account_tbl;
CREATE TABLE account_tbl  (
  id int(11) NOT NULL AUTO_INCREMENT,
  user_id varchar(255) CHARACTER SET utf8 COLLATE utf8_general_ci NULL DEFAULT NULL,
  money int(11) NULL DEFAULT 0,
  PRIMARY KEY (id) USING BTREE
) ENGINE = InnoDB AUTO_INCREMENT = 11111112 CHARACTER SET = utf8 COLLATE = utf8_general_ci ROW_FORMAT = Compact;

-- ----------------------------
-- Records of account_tbl
-- ----------------------------
INSERT INTO account_tbl VALUES (11111111, '2', 1000);

SET FOREIGN_KEY_CHECKS = 1;
order_tbl.sql
SET NAMES utf8mb4;
SET FOREIGN_KEY_CHECKS = 0;

-- ----------------------------
-- Table structure for order_tbl
-- ----------------------------
DROP TABLE IF EXISTS order_tbl;
CREATE TABLE order_tbl  (
  id int(11) NOT NULL AUTO_INCREMENT,
  user_id varchar(1000) CHARACTER SET utf8 COLLATE utf8_general_ci NULL DEFAULT NULL,
  commodity_code varchar(255) CHARACTER SET utf8 COLLATE utf8_general_ci NULL DEFAULT NULL,
  count int(11) NULL DEFAULT 0,
  money int(11) NULL DEFAULT 0,
  PRIMARY KEY (id) USING BTREE
) ENGINE = InnoDB AUTO_INCREMENT = 1006 CHARACTER SET = utf8 COLLATE = utf8_general_ci ROW_FORMAT = Compact;

SET FOREIGN_KEY_CHECKS = 1;
storage_tbl.sql
SET NAMES utf8mb4;
SET FOREIGN_KEY_CHECKS = 0;

-- ----------------------------
-- Table structure for storage_tbl
-- ----------------------------
DROP TABLE IF EXISTS storage_tbl;
CREATE TABLE storage_tbl  (
  id int(11) NOT NULL AUTO_INCREMENT,
  commodity_code varchar(255) CHARACTER SET utf8 COLLATE utf8_general_ci NULL DEFAULT NULL,
  count int(11) NULL DEFAULT 0,
  create_time datetime(0) NULL DEFAULT NULL,
  update_time datetime(0) NULL DEFAULT NULL,
  PRIMARY KEY (id) USING BTREE
) ENGINE = InnoDB AUTO_INCREMENT = 77 CHARACTER SET = utf8 COLLATE = utf8_general_ci ROW_FORMAT = Compact;

-- ----------------------------
-- Records of storage_tbl
-- ----------------------------
INSERT INTO storage_tbl VALUES (1, 'iphone11', 100, '2020-09-28 16:55:51', '2020-10-14 16:13:21');

SET FOREIGN_KEY_CHECKS = 1;
集成mybatis plus
配置代码生成器
1、 父工程中的pom添加plus及mysql驱动包;
        <dependency>
            <groupId>com.baomidou</groupId>
            <artifactId>mybatis-plus-boot-starter</artifactId>
            <version>3.4.2</version>
        </dependency>
        <dependency>
            <groupId>mysql</groupId>
            <artifactId>mysql-connector-java</artifactId>
            <version>6.0.5</version>
        </dependency>
        <dependency>
            <groupId>org.projectlombok</groupId>
            <artifactId>lombok</artifactId>
        </dependency>
1、 seata-service-account模块添加代码生成相关依赖;
        <!-- https://mvnrepository.com/artifact/com.baomidou/mybatis-plus-generator -->
        <dependency>
            <groupId>com.baomidou</groupId>
            <artifactId>mybatis-plus-generator</artifactId>
            <version>3.4.1</version>
        </dependency>
        <dependency>
            <groupId>org.apache.velocity</groupId>
            <artifactId>velocity-engine-core</artifactId>
            <version>2.2</version>
        </dependency>
1、 添加代码生成类CodeGenerator;
package org.seata.service.account.mybatisplus;

import com.baomidou.mybatisplus.annotation.DbType;
import com.baomidou.mybatisplus.generator.AutoGenerator;
import com.baomidou.mybatisplus.generator.InjectionConfig;
import com.baomidou.mybatisplus.generator.config.*;
import com.baomidou.mybatisplus.generator.config.builder.ConfigBuilder;
import com.baomidou.mybatisplus.generator.config.rules.DateType;
import com.baomidou.mybatisplus.generator.config.rules.FileType;
import com.baomidou.mybatisplus.generator.config.rules.NamingStrategy;

import java.io.File;
// 演示例子,执行 main 方法控制台输入模块表名回车自动生成对应项目目录中
public class CodeGenerator {


    public static void main(String[] args) {


        GlobalConfig config = new GlobalConfig();

        DataSourceConfig dataSourceConfig = new DataSourceConfig();
        dataSourceConfig.setDbType(DbType.MYSQL)
                // 数据库地址
                .setUrl("jdbc:mysql://localhost:3306/db_storage?useUnicode=true&useSSL=false&characterEncoding=utf8&serverTimezone=GMT%2B8")
                // 用户名
                .setUsername("root")
                // 密码
                .setPassword("123456")
                .setDriverName("com.mysql.cj.jdbc.Driver");
        StrategyConfig strategyConfig = new StrategyConfig();
        strategyConfig
                .setCapitalMode(true)
                .setEntityLombokModel(false)
                .setNaming(NamingStrategy.underline_to_camel)
                .setEntityLombokModel(true)
                .setRestControllerStyle(true)
                .setTablePrefix("t_", "sys_", "config_", "base_");
        config.setActiveRecord(false)
                .setEnableCache(false)
                .setAuthor("td")
                // 输出位置
                .setOutputDir("D:\\test\\seata-1.4.0\\script\\server\\db")
                .setFileOverride(true)
                .setServiceName("%sService")
                .setDateType(DateType.ONLY_DATE);

        InjectionConfig cfg = new InjectionConfig() {


            @Override
            public void initMap() {


            }
        };
        cfg.setFileCreate(new IFileCreate() {


            @Override
            public boolean isCreate(ConfigBuilder configBuilder, FileType fileType, String filePath) {


                checkDir(filePath);
                File file = new File(filePath);
                boolean exist = file.exists();
                if (exist) {


                    return FileType.ENTITY == fileType;
                }
                return true;
            }
        });
        new AutoGenerator().setGlobalConfig(config)
                .setDataSource(dataSourceConfig)
                .setStrategy(strategyConfig)
                .setCfg(cfg)
                .setPackageInfo(
                        new PackageConfig()
                                // 模块包路径
                                .setParent("org.seata.service.storage")
                                .setController("controller")
                                .setEntity("entity")
                                .setMapper("dao")
                                .setXml("dao.mapper")
                ).execute();
    }
}
1、 修改相关注释下的配置信息,生成代码,并复制到各个子模块中;

配置mybatis plus
1、 各模块添加数据库配置信息;
server:
  port: 10000
spring:
  application:
    name: seata-service-account
  cloud:
    nacos:
      discovery:
        server-addr: 127.0.0.1:8848
  datasource:
    type: com.zaxxer.hikari.HikariDataSource
    driver-class-name: com.mysql.cj.jdbc.Driver
    url: jdbc:mysql://127.0.0.1:3306/db_account?useUnicode=true&characterEncoding=utf8&serverTimezone=GMT%2B8&useSSL=false
    username: root
    password: 123456
    hikari:
      minimum-idle: 5
      idle-timeout: 600000
      maximum-pool-size: 10
      auto-commit: true
      pool-name: MyHikariCP
      max-lifetime: 1800000
      connection-timeout: 30000
      connection-test-query: SELECT 1
1、 各个子模块在SpringBoot启动类中添加@MapperScan注解,扫描Mapper文件夹;
@MapperScan("org.seata.service.account.dao")
1、 添加测试接口;
@RestController
public class TestController {


    @Autowired
    TestFeign testFeign;
    @Autowired
    AccountTblMapper accountTblMapper;

    @GetMapping("/test")
    public Object test() {


        testFeign.test();
        return accountTblMapper.selectById("11111111");
    }
}
1、 启动各模块并访问test;

配置SQL打印
1、 父pom添加p6spy;
<!-- https://mvnrepository.com/artifact/p6spy/p6spy -->
<dependency>
    <groupId>p6spy</groupId>
    <artifactId>p6spy</artifactId>
    <version>3.9.1</version>
</dependency>
1、 resources下添加配置文件spy.properties;
#3.2.1以上使用
modulelist=com.baomidou.mybatisplus.extension.p6spy.MybatisPlusLogFactory,com.p6spy.engine.outage.P6OutageFactory
#3.2.1以下使用或者不配置
#modulelist=com.p6spy.engine.logging.P6LogFactory,com.p6spy.engine.outage.P6OutageFactory
# 自定义日志打印
logMessageFormat=com.baomidou.mybatisplus.extension.p6spy.P6SpyLogger
#日志输出到控制台
appender=com.baomidou.mybatisplus.extension.p6spy.StdoutLogger
# 使用日志系统记录 sql
#appender=com.p6spy.engine.spy.appender.Slf4JLogger
# 设置 p6spy driver 代理
deregisterdrivers=true
# 取消JDBC URL前缀
useprefix=true
# 配置记录 Log 例外,可去掉的结果集有error,info,batch,debug,statement,commit,rollback,result,resultset.
excludecategories=info,debug,result,commit,resultset
# 日期格式
dateformat=yyyy-MM-dd HH:mm:ss
# 实际驱动可多个
#driverlist=org.h2.Driver
# 是否开启慢SQL记录
outagedetection=true
# 慢SQL记录标准 2 秒
outagedetectioninterval=2
1、 修改yml配置;
    driver-class-name: com.p6spy.engine.spy.P6SpyDriver
    url: jdbc:p6spy:mysql://127.0.0.1:3306/db_account?useUnicode=true&characterEncoding=utf8&serverTimezone=GMT%2B8&useSSL=false

1、 访问测试接口,查看控制台;

版权声明:本文不是「本站」原创文章,版权归原作者所有 | 原文地址: