一、实现功能
将数据库中数据,批量导入solr,构建全文检索。
二、环境
1、 CentOS6.4;
2、 CDH5.7.0;
3、 solr-4.10.3-cdh5.7.0;
三、步骤
1、 导入原始数据库;

2、 依据业务修改schema.xml;
vi solr-4.10.3-cdh5.7.0/solrhome/collection2/conf/schema.xml
针对具体的业务需要自定义一套Field,例如:
<!--product-->
<field name="product_name" type="text_ik" indexed="true" stored="true"/>
<field name="product_price"  type="float" indexed="true" stored="true"/>
<field name="product_description" type="text_ik" indexed="true" stored="false" />
<field name="product_picture" type="string" indexed="false" stored="true" />
<field name="product_catalog_name" type="string" indexed="true" stored="true" />

<field name="product_keywords" type="text_ik" indexed="true" stored="false" multiValued="true"/>
<copyField source="product_name" dest="product_keywords"/>
<copyField source="product_description" dest="product_keywords"/>
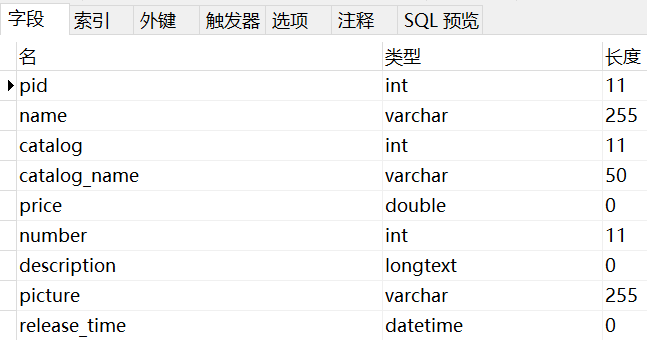
这些自定义域,要与数据库中对应字段对应,名称不一定一样,但是要有清晰的对应关系,如下

3、 使用dataimport插件批量导入,将dataimport插件依赖的jar包添加到实例solrcore的lib下(solrhome/collection1/lib)中;
(1)solr-4.10.3-cdh5.7.0/dist中的
solr-dataimporthandler-4.10.3-cdh5.7.0.jar
solr-dataimporthandler-extras-4.10.3-cdh5.7.0.jar
(2)mysql数据库连接驱动包
mysql-connector-java-5.1.27-bin.jar
4、 配置solrconfig.mxl文件,添加一个requestHandler;
   <requestHandler name="/dataimport"
class="org.apache.solr.handler.dataimport.DataImportHandler">
    <lst name="defaults">
      <str name="config">data-config.xml</str>
     </lst>
  </requestHandler>
5、 在solrconfig.mxl同级目录下,创建data-config.xml,即数据导入配置文件;
(1)作用是:
-》连接数据库
-》SQL语句
-》构建数据库原始字段与solr新定义的域的对应关系
(2)具体内容
<?xml version="1.0" encoding="UTF-8" ?>
<dataConfig>
<dataSource type="JdbcDataSource"
		  driver="com.mysql.jdbc.Driver"
		  url="jdbc:mysql://hadoop:3306/test"
		  user="root"
		  password="mysql密码"/>
<document>
	<entity name="product" query="SELECT pid,name,catalog_name,price,description,picture FROM products ">
		 <field column="pid" name="id"/>
		 <field column="name" name="product_name"/>
		 <field column="catalog_name" name="product_catalog_name"/>
		 <field column="price" name="product_price"/>
		 <field column="description" name="product_description"/>
		 <field column="picture" name="product_picture"/>
	</entity>
</document>

</dataConfig>
6、 重启tomcat;
四、测试
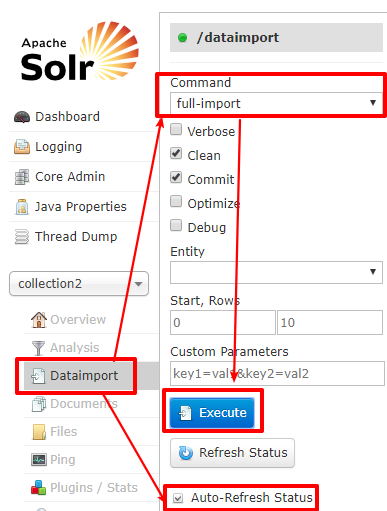
1、 进入solr;

2、 点击Execute执行,然后,等待结果;

3、 成功~;
版权声明:本文不是「本站」原创文章,版权归原作者所有 | 原文地址: