作者:唐亚峰 | 出自:https://blog.battcn.com
SpringBoot 是为了简化 Spring 应用的创建、运行、调试、部署等一系列问题而诞生的产物,自动装配的特性让我们可以更好的关注业务本身而不是外部的XML配置,我们只需遵循规范,引入相关的依赖就可以轻易的搭建出一个 WEB 工程
随着互联网技术的发展,现在的网站架构基本都由原来的后端渲染,变成了:前端渲染、前后端分离的形态,而且前端技术和后端技术在各自的道路上越走越远。
前端和后端唯一联系,变成了API接口;API文档自然就成了前后端开发人员联系的纽带,变得尤为的重要,swagger就是一款让你更好的书写API文档的框架。
文档工具
没有API文档工具之前,基本都是手写API文档的,如有在Word上写的,有在对应的项目目录下readme.md上写的,每个公司都有每个公司的玩法,无所谓好坏。但是这种手写文档带来的弊端就是维护起来苦不堪言,对于接口容易发生变化的开发者来说,维护文档就是噩梦….
好在现如今市场上书写API文档的工具有很多,常见的有 postman、yapi、阿里的RAP 但是能称之为框架的,估计也只有swagger了。
swagger优缺点
- 集成方便,功能强大
- 在线调试与文档生成
- 代码耦合,需要注解支持,但不影响程序性能
导入依赖
在pom.xml 中添加 swagger-spring-boot-starter 的依赖
     org.springframework.boot


     spring-boot-starter-web


     com.battcn


     swagger-spring-boot-starter


     1.4.5-RELEASE
属性配置
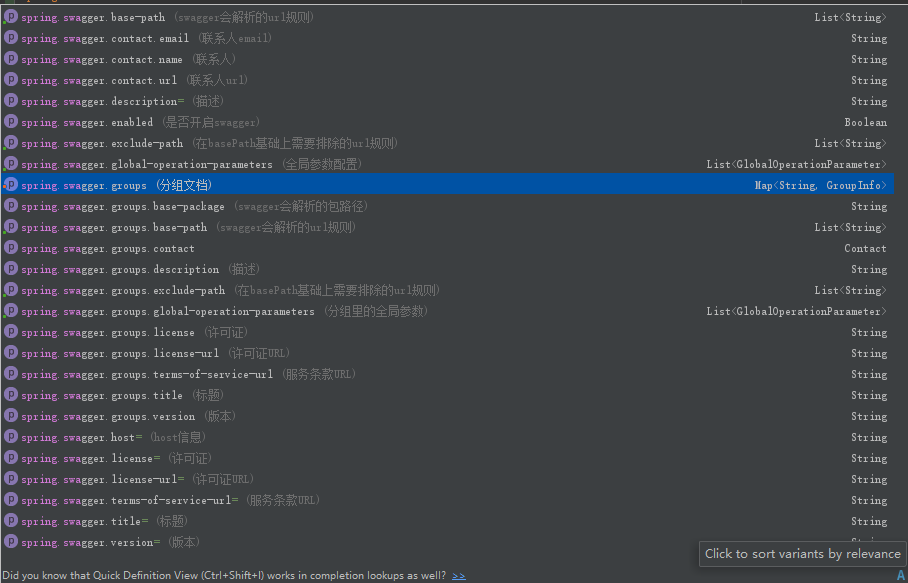
配置spring.swagger.enabled开启swagger的使用,如果在生产环境中不想用可以在对应的profile下面将它设置为spring.swagger.enabled=false,这样一来接口就不存在暴露的风险
# 扫描的包路径,默认扫描所有
spring.swagger.base-package=com.battcn
# 默认为 true
spring.swagger.enabled=true

实体类
swagger 提供了非常齐全的注解,为POJO提供了@ApiModel、@ApiModelProperty,以便更好的渲染最终结果
package com.battcn.entity;
import io.swagger.annotations.ApiModel;
import io.swagger.annotations.ApiModelProperty;
import java.io.Serializable;
/**
 * @author Levin
 * @since 2018/5/10 0007
 */
@ApiModel
public class User implements Serializable {
    private static final long serialVersionUID = 8655851615465363473L;
    private Long id;
    @ApiModelProperty("用户名")
    private String username;
    @ApiModelProperty("密码")
    private String password;
    // TODO  省略get set
}
restful 风格接口
注解描述
- @Api: 描述Controller
- @ApiIgnore: 忽略该Controller,指不对当前类做扫描
- @ApiOperation: 描述Controller类中的method接口
- @ApiParam: 单个参数描述,与@ApiImplicitParam不同的是,他是写在参数左侧的。如(@ApiParam(name = "username",value = "用户名") String username)
- @ApiModel: 描述POJO对象
- @ApiProperty: 描述POJO对象中的属性值
- @ApiImplicitParam: 描述单个入参信息
- @ApiImplicitParams: 描述多个入参信息
- @ApiResponse: 描述单个出参信息
- @ApiResponses: 描述多个出参信息
- @ApiError: 接口错误所返回的信息
package com.battcn.controller;
import com.battcn.entity.User;
import com.battcn.swagger.properties.ApiDataType;
import com.battcn.swagger.properties.ApiParamType;
import io.swagger.annotations.Api;
import io.swagger.annotations.ApiImplicitParam;
import io.swagger.annotations.ApiImplicitParams;
import io.swagger.annotations.ApiOperation;
import org.slf4j.Logger;
import org.slf4j.LoggerFactory;
import org.springframework.web.bind.annotation.*;
/**
 * swagger
 *
 * @author Levin
 * @since 2018/5/16 0016
 */
@RestController
@RequestMapping("/users")
@Api(tags = "1.1", description = "用户管理", value = "用户管理")
public class UserController {
    private static final Logger log = LoggerFactory.getLogger(UserController.class);
    @GetMapping
    @ApiOperation(value = "条件查询(DONE)")
    @ApiImplicitParams({
            @ApiImplicitParam(name = "username", value = "用户名", dataType = ApiDataType.STRING, paramType = ApiParamType.QUERY),
            @ApiImplicitParam(name = "password", value = "密码", dataType = ApiDataType.STRING, paramType = ApiParamType.QUERY),
    })
    public User query(String username, String password) {
        log.info("多个参数用  @ApiImplicitParams");
        return new User(1L, username, password);
    }
    @GetMapping("/{id}")
    @ApiOperation(value = "主键查询(DONE)")
    @ApiImplicitParams({
            @ApiImplicitParam(name = "id", value = "用户编号", dataType = ApiDataType.LONG, paramType = ApiParamType.PATH),
    })
    public User get(@PathVariable Long id) {
        log.info("单个参数用  @ApiImplicitParam");
        return new User(id, "u1", "p1");
    }
    @DeleteMapping("/{id}")
    @ApiOperation(value = "删除用户(DONE)")
    @ApiImplicitParam(name = "id", value = "用户编号", dataType = ApiDataType.LONG, paramType = ApiParamType.PATH)
    public void delete(@PathVariable Long id) {
        log.info("单个参数用 ApiImplicitParam");
    }
    @PostMapping
    @ApiOperation(value = "添加用户(DONE)")
    public User post(@RequestBody User user) {
        log.info("如果是 POST PUT 这种带 @RequestBody 的可以不用写 @ApiImplicitParam");
        return user;
    }
    @PutMapping("/{id}")
    @ApiOperation(value = "修改用户(DONE)")
    public void put(@PathVariable Long id, @RequestBody User user) {
        log.info("如果你不想写 @ApiImplicitParam 那么 swagger 也会使用默认的参数名作为描述信息 ");
    }
}
注意
如果访问没有正常显示,请在Application.java 中添加 @EnableSwagger2Doc
测试
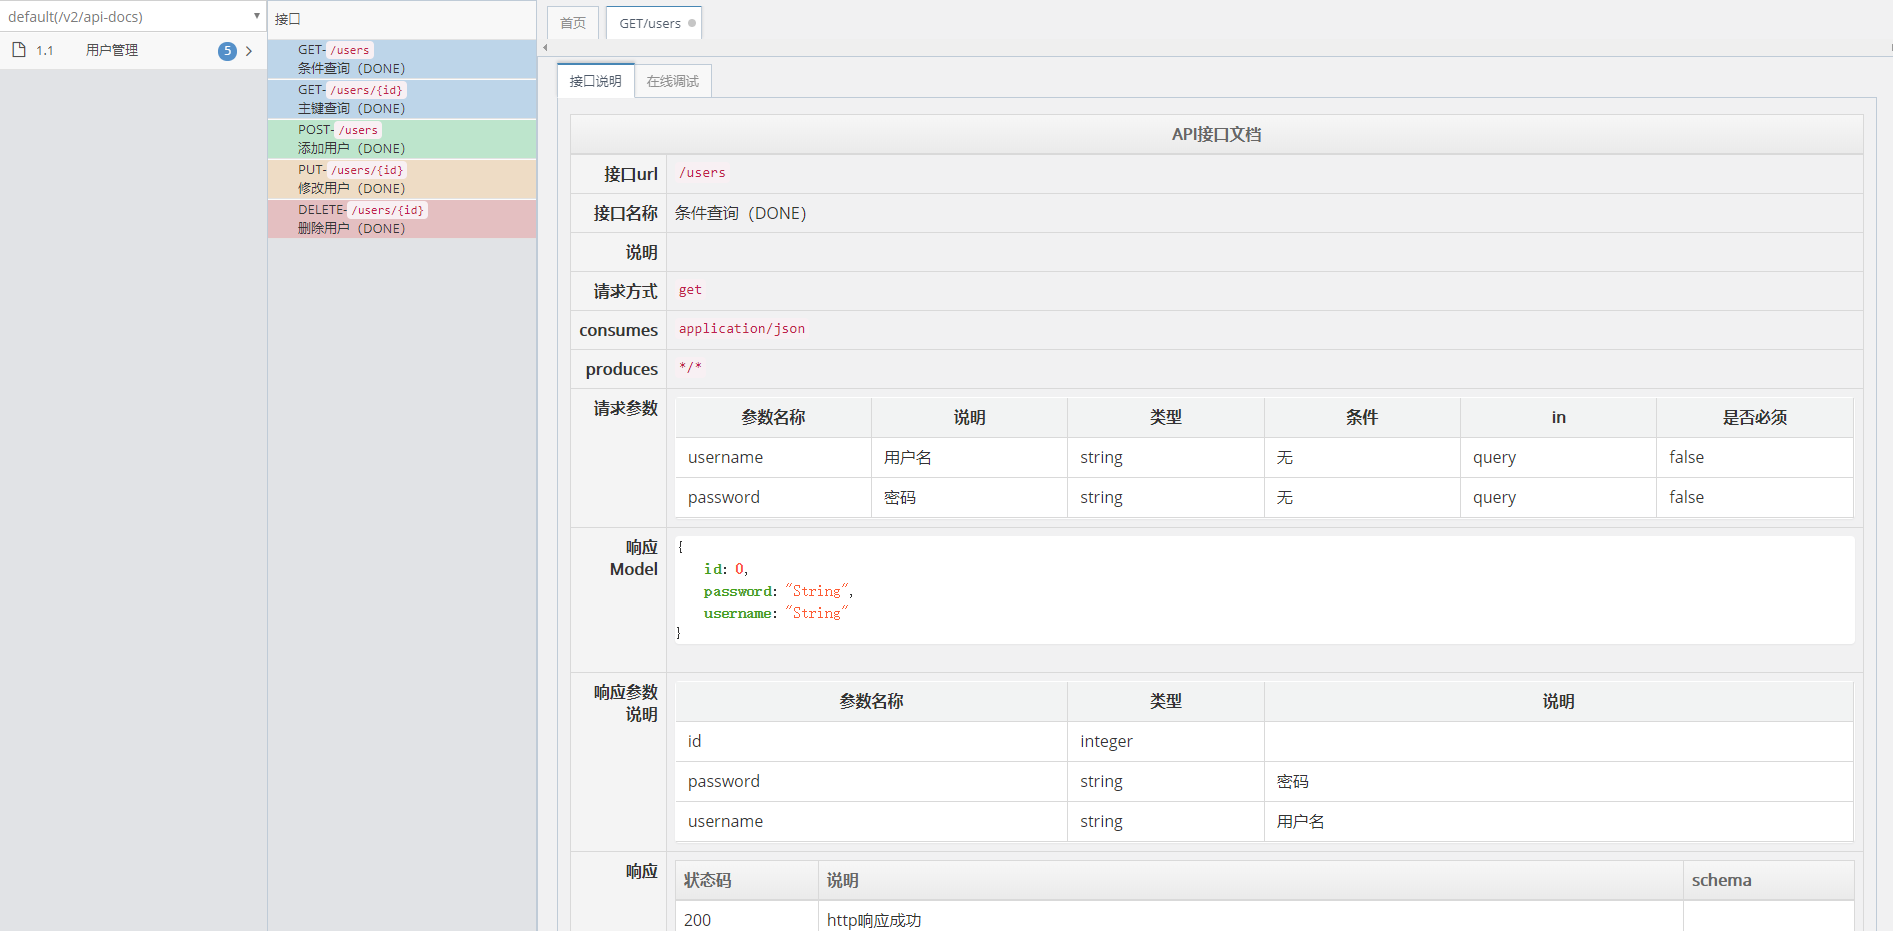
由于上面的接口是 restful 风格的接口,添加和修改无法通过浏览器完成,以前都是自己编写junit或者使用postman之类的工具。现在只需要打开浏览器输入 http://localhost:8080/swagger-ui.html,更多操作请自行体验…

总结
目前很多大佬都写过关于 SpringBoot 的教程了,如有雷同,请多多包涵,本教程基于最新的 spring-boot-starter-parent:2.0.2.RELEASE编写,包括新版本的特性都会一起介绍…
说点什么
全文代码:https://github.com/battcn/spring-boot2-learning/tree/master/chapter10