
配置能写进文件,不代表被目标版本绑定。新增实验固定 Spring Boot 3.2.4,使用 spring.data.redis.*;原资料的 spring.redis.*、旧 RedisProperties 片段保留在历史部分,不能直接当作本次配置。
核对前缀、数据库与超时
复用前一篇集成文章中的 POM 和 RedisExampleApplication。把下列内容放到 src/test/resources/application.properties,数据库 5 仅用于本轮独立实例。
spring.data.redis.host=127.0.0.1
spring.data.redis.port=6379
spring.data.redis.database=5
spring.data.redis.timeout=2s
spring.data.redis.connect-timeout=2s
spring.main.banner-mode=off
完整测试
测试文件放在 src/test/java/site/RedisConfigTest.java:
package site;

import java.time.Duration;
import org.junit.jupiter.api.Test;
import org.springframework.beans.factory.annotation.Autowired;
import org.springframework.boot.autoconfigure.data.redis.RedisProperties;
import org.springframework.boot.test.context.SpringBootTest;
import org.springframework.data.redis.connection.lettuce.LettuceConnectionFactory;
import static org.junit.jupiter.api.Assertions.*;

@SpringBootTest(classes = RedisExampleApplication.class)
class RedisConfigTest {
  @Autowired RedisProperties properties;
  @Autowired LettuceConnectionFactory factory;
  @Test void bindsPropertiesAndPings() {
    assertEquals(5, properties.getDatabase());
    assertEquals(Duration.ofSeconds(2), properties.getTimeout());
    assertEquals(5, factory.getDatabase());
    assertEquals(Duration.ofSeconds(2), factory.getClientConfiguration().getCommandTimeout());
    try (var connection = factory.getConnection()) {
      assertEquals("PONG", connection.ping());
    }
    System.out.println("database=5; command-timeout=2s; ping=PONG");
  }
}
mvn -Dtest=RedisConfigTest test
本次测试输出包含:
database=5; command-timeout=2s; ping=PONG
结论边界
测试同时检查属性对象与 Lettuce 连接工厂的数据库和命令超时,再发出 PING。它没有制造超时,不证明网络故障一定在两秒内结束;connect-timeout 与命令 timeout 也不是同一概念。Redis Cluster 不支持任意数据库索引,不能把这里的 database=5 复制到集群方案。旧资料中并列的单实例、Sentinel 和 Cluster 项属于不同连接条件,本轮未验证后两种。
下一步阅读
历史范例(未重建原环境)
以下保留旧资料的示例与输出,并校正语言标记和已发现的概念错误。含 MariaDB、旧 PHP/PDO、旧 Redis 或旧 JDK 语境的片段,本轮没有逐一运行;新实验的验证结论只适用于上方完整源码。不要把历史截图中的结果当作本轮输出。
前言
Redis作为当前最火的NoSql数据库,支持很多语言客户端操作Redis。
而SpringBoot最为Java当前最火的开发框架,提供了spring-data-redis框架实现对Redis的各种操作。
在springboot 1.5.x版本的默认的Redis客户端是 Jedis实现的,springboot 2.x版本中默认客户端是用 lettuce实现的。
Lettuce 和 jedis 的都是连接 Redis Server的客户端,Jedis 在实现上是直连 redis server,多线程环境下非线程安全,除非使用连接池,为每个 redis实例增加物理连接。
Lettuce 是 一种可伸缩,线程安全,完全非阻塞的Redis客户端,多个线程可以共享一个RedisConnection,它利用Netty NIO 框架来高效地管理多个连接,从而提供了异步和同步数据访问方式,用于构建非阻塞的反应性应用程序。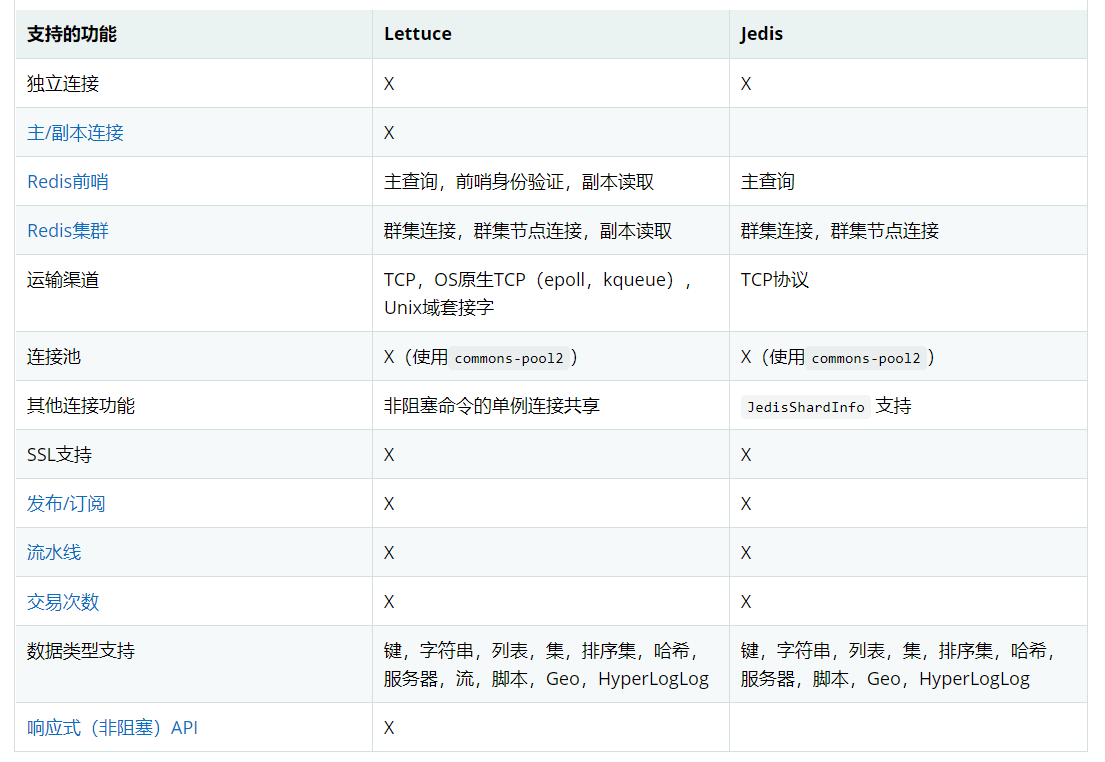
Spring Data Redis
Spring Data Redis是较大的Spring Data系列的一部分,可轻松配置并从Spring应用程序访问Redis。它提供了与商店交互的低层和高层抽象,使用户摆脱了基础设施方面的顾虑。
特性
- 连接包是跨多个Redis驱动程序(Lettuce和Jedis)的低级抽象。
- 将Redis驱动程序异常转换为Spring的可移植数据访问异常层次结构。
- RedisTemplate提供了用于执行各种Redis操作,异常转换和序列化支持的高级抽象。
- Pubsub支持(例如,消息驱动的POJO的MessageListenerContainer)。
- Redis Sentinel和Redis Cluster支持。
- 使用Lettuce驱动程序的反应性API。
- JDK,String,JSON和Spring Object / XML映射序列化器。
- Redis之上的JDK Collection实现。
- 原子计数器支持类。
- 排序和流水线功能。
- 专门支持SORT,SORT / GET模式和返回的批量值。
- Spring 3.1缓存抽象的Redis实现。
- Repository接口的自动实现,包括使用的自定义查询方法的支持@EnableRedisRepositories。
- CDI对存储库的支持。
Spring框架的核心功能
Spring Data使用Spring框架的核心功能,包括:
- IoC容器
- 类型转换系统
- 表达语言
- JMX整合
- DAO异常层次结构。
虽然您不需要了解Spring API,但了解它们背后的概念很重要。至少,应该熟悉控制反转(IoC)的概念,并且您应该熟悉选择使用的任何IoC容器。
Redis支持的核心功能可以直接使用,而无需调用Spring容器的IoC服务。这很像JdbcTemplate,无需使用Spring容器的任何其他服务就可以“独立”使用。要利用Spring Data Redis的所有功能,例如存储库支持,您需要配置库的某些部分以使用Spring。
案例
创建项目
1、 创建一个普通SpringBoot项目;
2、 添加pom;
<parent>
    <groupId>org.springframework.boot</groupId>
    <artifactId>spring-boot-starter-parent</artifactId>
    <version>2.4.5</version>
    <relativePath/> <!-- lookup parent from repository -->
</parent>
<groupId>org.pearl</groupId>
<artifactId>spring-boot-redis-demo</artifactId>
<version>0.0.1-SNAPSHOT</version>
<name>spring-boot-redis-demo</name>
<description>Demo project for Spring Boot</description>

<properties>
    <java.version>1.8</java.version>
</properties>
<dependencies>
    <dependency>
        <groupId>org.springframework.boot</groupId>
        <artifactId>spring-boot-starter-data-redis</artifactId>
    </dependency>
    <dependency>
        <groupId>org.apache.commons</groupId>
        <artifactId>commons-pool2</artifactId>
    </dependency>
    <dependency>
        <groupId>org.springframework.boot</groupId>
        <artifactId>spring-boot-starter-web</artifactId>
    </dependency>
    <dependency>
        <groupId>org.springframework.boot</groupId>
        <artifactId>spring-boot-starter-test</artifactId>
        <scope>test</scope>
    </dependency>
</dependencies>
1、 创建启动类;
@SpringBootApplication
public class SpringBootRedisDemoApplication {


    public static void main(String[] args) {


        SpringApplication.run(SpringBootRedisDemoApplication.class, args);
    }
}
1、 添加基础配置;
server.port=9000
spring.application.name=spring-boot-redis-demo
配置类
RedisProperties配置类,提供了Redis集成Boot的相关配置。
# 核心配置
    private int database = 0;
    private String url;
    private String host = "localhost";
    private String username;
    private String password;
    private int port = 6379;
    private boolean ssl;
    private Duration timeout;
    private Duration connectTimeout;
    private String clientName;
    private RedisProperties.ClientType clientType;
    private RedisProperties.Sentinel sentinel;
    private RedisProperties.Cluster cluster;
    private final RedisProperties.Jedis jedis = new RedisProperties.Jedis();
    private final RedisProperties.Lettuce lettuce = new RedisProperties.Lettuce();
# 连接池配置
 public static class Pool {


        private int maxIdle = 8;
        private int minIdle = 0;
        private int maxActive = 8;
        private Duration maxWait = Duration.ofMillis(-1L);
        private Duration timeBetweenEvictionRuns;
}
# 集群模式下Lettuce客户端配置
        private boolean dynamicRefreshSources = true;
        private Duration period;
        private boolean adaptive;
spring data redis全部配置项详解
# redis 配置项
# 连接URL,配置后会覆盖host、port等配置,eg: redis://user:password@example.com:6379
spring.redis.url=
# 连接地址
spring.redis.host=127.0.0.1
# Redis服务器连接端口
spring.redis.port=6379
# 连接工厂使用的数据库索引(0-15),默认为0
spring.redis.database=0
# Redis服务器连接用户
spring.redis.username=
# Redis服务器连接密码(默认为空)
spring.redis.password=123456
# 是否启用SSL支持
spring.redis.ssl=false
# 读取超时
spring.redis.timeout=5000
# 连接超时
spring.redis.connect-timeout=10000
# 在与CLIENT SETNAME的连接上设置的客户端名称
spring.redis.client-name=
# 要使用的客户端类型。默认情况下,根据类路径自动检测
spring.redis.client-type=lettuce
# Redis哨兵属性
# Redis服务器名称
spring.redis.sentinel.master=sentinel-redis
# 哨兵节点,以逗号分隔的“ host:port”对列表
spring.redis.sentinel.nodes=127.0.0.1:7000,127.0.0.1:7001
# 用于使用哨兵进行身份验证的密码
spring.redis.sentinel.password=123456

# 集群属性
# 以逗号分隔的“ host:port”对列表,这表示集群节点的“初始”列表,并且要求至少具有一个条目
spring.redis.cluster.nodes=127.0.0.1:7000,127.0.0.1:7001
# 在集群中执行命令时要遵循的最大重定向数
spring.redis.cluster.max-redirects=1
# 拓扑动态感应即客户端能够根据 redis cluster 集群的变化,动态改变客户端的节点情况,完成故障转移。
spring.redis.lettuce.cluster.refresh.adaptive=true
# 是否发现和查询所有群集节点以获取群集拓扑。设置为false时,仅将初始种子节点用作拓扑发现的源
spring.redis.lettuce.cluster.refresh.dynamic-refresh-sources=false
# 集群拓扑刷新周期
spring.redis.lettuce.cluster.refresh.period=1000

# 连接池配置
# 连接池池中“空闲”连接的最大数量。使用负值表示无限数量的空闲连接,默认为8
spring.redis.lettuce.pool.max-idle=8
# 中维护的最小空闲连接数,默认为0
spring.redis.lettuce.pool.min-idle=0
# 连接池可以分配的最大连接数。使用负值表示没有限制,默认为8
spring.redis.lettuce.pool.max-active=8
# 当连接池耗尽时,在抛出异常之前,连接分配应阻塞的最长时间。使用负值无限期等待,默认为-1
spring.redis.lettuce.pool.max-wait=-1
# 空闲连接从运行到退出的时间间隔。当为正时,空闲连接回收线程启动,否则不执行空闲连接回收
spring.redis.lettuce.pool.time-between-eviction-runs=
# 宕机超时时间,默认100ms
spring.redis.lettuce.shutdown-timeout=100
启动项目
1、 添加配置,删除掉上面中sentinel及cluster的相关配置即可;
2、 启动项目,基础环境搭建完成;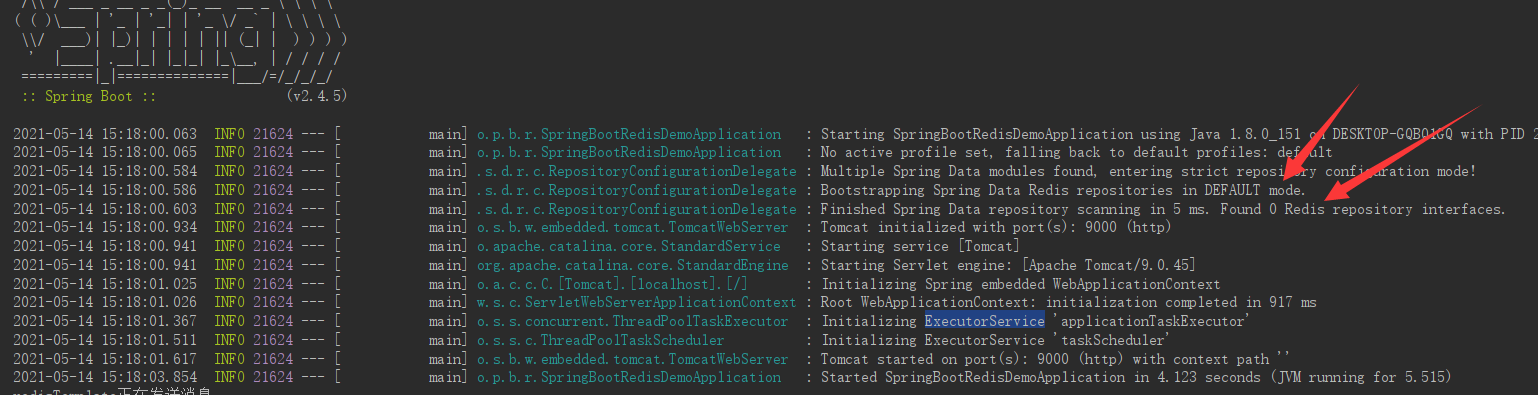
版权声明:本文不是「本站」原创文章,版权归原作者所有 | 原文地址: